
Most pear cultivars should not be allowed to ripen on the tree. They should be picked while still firm and ripened after harvest. Tree-ripened fruits are often of poor quality because of the development of grit cells and the browning and softening of the inner flesh. Pears ripen from the inside out and waiting until the outside is completely ripe will often result in the interior of the fruit being mushy and brown.
Commercial growers determine the best time to harvest pears by measuring the decrease in fruit firmness as the fruit matures. This varies with growing conditions and variety. A Magness meter is used for testing and measures the pressure needed to push a 5/16-inch tip a specified distance into an individual fruit. Home gardeners can use these other indicators:
1. A change in the fruit ground color from a dark green to light green or yellowish green. The ground color is the "background" color of the fruit.
2. Fruit should part easily from the branch when it is lifted up and twisted.
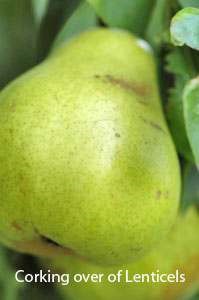
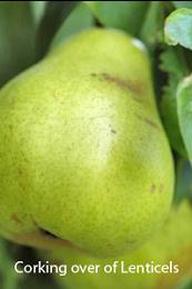
3. Corking over of lenticels. Lenticels are the "breathing pores" of the fruit. They start out as a white to greenish white color and turn brown due to corking as the fruit nears maturity. They look like brown “specks” on the fruit.
4. Development of characteristic pear aroma and taste of sampled fruit. Pears will actually be of higher quality if they are cooled immediately after harvest. Temperatures between 31 and 50 degrees will work with the warmer temperatures actually reducing the amount of chilling needed. Just don’t go over 50 degrees. Homeowners may want to use a refrigerator, if possible. The amount of chilling required varies by cultivar from 2 days to several weeks.
Pears ripen in one to three weeks after being removed from storage if held at 60 to 65 degrees F. They can then be canned or preserved. If you wish to store some for ripening later, fresh-picked fruit should be placed in cold storage at around 31degrees F and 90 percent humidity. Placing fruit in unsealed gallon plastic bags can provide the necessary humidity.
Ripen small amounts as needed by moving them to a warmer location and holding them at 60 to 65 degrees F. Ripening at too high a temperature (75 degrees F and higher) may result in the fruit breaking down without ripening. (Ward Upham)
Commercial growers determine the best time to harvest pears by measuring the decrease in fruit firmness as the fruit matures. This varies with growing conditions and variety. A Magness meter is used for testing and measures the pressure needed to push a 5/16-inch tip a specified distance into an individual fruit. Home gardeners can use these other indicators:
1. A change in the fruit ground color from a dark green to light green or yellowish green. The ground color is the "background" color of the fruit.
2. Fruit should part easily from the branch when it is lifted up and twisted.
3. Corking over of lenticels. Lenticels are the "breathing pores" of the fruit. They start out as a white to greenish white color and turn brown due to corking as the fruit nears maturity. They look like brown “specks” on the fruit.
4. Development of characteristic pear aroma and taste of sampled fruit. Pears will actually be of higher quality if they are cooled immediately after harvest. Temperatures between 31 and 50 degrees will work with the warmer temperatures actually reducing the amount of chilling needed. Just don’t go over 50 degrees. Homeowners may want to use a refrigerator, if possible. The amount of chilling required varies by cultivar from 2 days to several weeks.
Pears ripen in one to three weeks after being removed from storage if held at 60 to 65 degrees F. They can then be canned or preserved. If you wish to store some for ripening later, fresh-picked fruit should be placed in cold storage at around 31degrees F and 90 percent humidity. Placing fruit in unsealed gallon plastic bags can provide the necessary humidity.
Ripen small amounts as needed by moving them to a warmer location and holding them at 60 to 65 degrees F. Ripening at too high a temperature (75 degrees F and higher) may result in the fruit breaking down without ripening. (Ward Upham)


 RSS Feed
