Video of the Week:
Pears, Tips on Harvesting
Turfgrass:
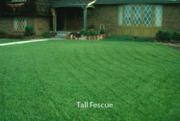
Fall Lawn Seeding Tips
The keys to successful lawn seeding are proper rates, even dispersal, good seed to soil contact, and proper watering. Evenness is best achieved by carefully calibrating the seeder or by adjusting the seeder to a low setting and making several passes to ensure even distribution. Seeding a little on the heavy side with close overlapping is better than missing areas altogether, especially for the bunch-type tall fescue, which does not spread. Multiple seeder passes in opposite directions should help avoid this problem.
A more serious error in seeding is using the improper rate. For tall fescue, aim for 6 to 8 pounds of seed per 1,000 square feet for new areas and about half as much for overseeding or seeding areas in the shade. Using too much seed results in a lawn more prone to disease and damage from stress. The best way to avoid such a mistake is to determine the square footage of the yard first, and then calculate the amount of seed. Using too little seed can also be detrimental and result in clumpy turf that is not as visually pleasing.
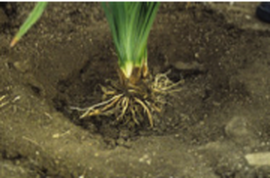
Establishing good seed to soil contact is essential for good germination rates. Slit seeders achieve good contact at the time of seeding by dropping seed directly behind the blade that slices a furrow into the soil. Packing wheels then follow to close the furrow. The same result can be accomplished by using a verticut before broadcasting the seed, and then verticutting a second time.
Core aerators can also be used to seed grass. Go over an area at least three times in different directions, and then broadcast the seed. Germination will occur in the aeration holes. Because those holes stay moister than a traditional seedbed, this method requires less watering. If seeding worked soil, use light hand raking to mix the seed into the soil. A leaf rake often works better than a garden rake because it mixes seed more shallowly.
Water newly planted areas lightly, but often. Keep soil constantly moist but not waterlogged. During hot days, a new lawn may need to be watered three times a day. If watered less, germination will be slowed. Cool, calm days may require watering only every couple of days. As the grass plants come up, gradually decrease watering to once a week if there is no rain. Let the plants tell you when to water. If you can push the blades down and they don't spring back up quickly, the lawn needs water. Once seed sprouts, try to minimize how much traffic (foot, mower, dog, etc.) seeded areas receive until the seedlings are a little more robust and ready to be mowed. Begin mowing once seedlings reach 3 to 4 inches tall. (Ward Upham)
A more serious error in seeding is using the improper rate. For tall fescue, aim for 6 to 8 pounds of seed per 1,000 square feet for new areas and about half as much for overseeding or seeding areas in the shade. Using too much seed results in a lawn more prone to disease and damage from stress. The best way to avoid such a mistake is to determine the square footage of the yard first, and then calculate the amount of seed. Using too little seed can also be detrimental and result in clumpy turf that is not as visually pleasing.
Establishing good seed to soil contact is essential for good germination rates. Slit seeders achieve good contact at the time of seeding by dropping seed directly behind the blade that slices a furrow into the soil. Packing wheels then follow to close the furrow. The same result can be accomplished by using a verticut before broadcasting the seed, and then verticutting a second time.
Core aerators can also be used to seed grass. Go over an area at least three times in different directions, and then broadcast the seed. Germination will occur in the aeration holes. Because those holes stay moister than a traditional seedbed, this method requires less watering. If seeding worked soil, use light hand raking to mix the seed into the soil. A leaf rake often works better than a garden rake because it mixes seed more shallowly.
Water newly planted areas lightly, but often. Keep soil constantly moist but not waterlogged. During hot days, a new lawn may need to be watered three times a day. If watered less, germination will be slowed. Cool, calm days may require watering only every couple of days. As the grass plants come up, gradually decrease watering to once a week if there is no rain. Let the plants tell you when to water. If you can push the blades down and they don't spring back up quickly, the lawn needs water. Once seed sprouts, try to minimize how much traffic (foot, mower, dog, etc.) seeded areas receive until the seedlings are a little more robust and ready to be mowed. Begin mowing once seedlings reach 3 to 4 inches tall. (Ward Upham)
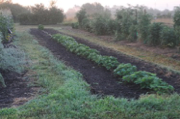
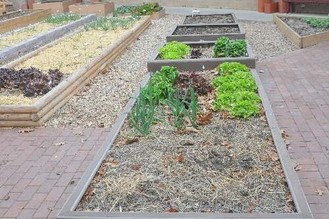
Overseeding a Lawn
Tall fescue lawns that have become thin over the summer can be thickened up by overseeding during September. Start by mowing the grass short (1 to 1.5 inches) and removing the clippings. This will make it easier to achieve good seed-soil contact and increase the amount of light that will reach the young seedlings.
Good seed-soil contact is vital if the overseeding is to be successful. Excess thatch can prevent seed from reaching the soil and germinating. Normally we want 1/4 inch of thatch or less when overseeding. If the thatch layer is 3/4 inch or more, it is usually easiest to use a sod cutter to remove it and start over with a new lawn. A power rake can be used to reduce a thatch layer that is less than 3/4 inch but more than a quarter inch.
Once thatch is under control, the soil should be prepared for the seed. This can be done in various ways. For small spots, a hand rake can be used to roughen up the soil before the seed is applied.
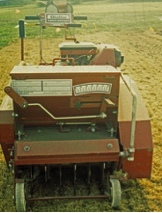
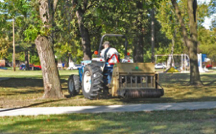
A verticut machine has solid vertical blades that can be set to cut furrows in the soil. It is best to go two different directions with the machine. A slit seeder is a verticut machine with a seed hopper added so the soil prep and seeding operation are combined. Another option is to use a core aerator.
The core aerator will punch holes in the soil and deposit the soil cores on the surface of the ground. Each hole produces an excellent environment for seed germination and growth. Make three to four passes with the core aerator to ensure enough holes for the seed. Using a core aerator has the additional benefit of reducing the amount of watering needed to get the seed germinated and growing. Aeration also increases the water infiltration rate, decreases compaction, and increases the amount of oxygen in the soil.
If the three methods, I prefer the slit seeder for obtaining good seed/soil contact. However, if watering is difficult, core aeration may be a better option. Regardless of method used, fertilize should be applied at the rate suggested by a soil test, or a starter fertilizer should be used at the rate suggested on the bag. (Ward Upham)
Good seed-soil contact is vital if the overseeding is to be successful. Excess thatch can prevent seed from reaching the soil and germinating. Normally we want 1/4 inch of thatch or less when overseeding. If the thatch layer is 3/4 inch or more, it is usually easiest to use a sod cutter to remove it and start over with a new lawn. A power rake can be used to reduce a thatch layer that is less than 3/4 inch but more than a quarter inch.
Once thatch is under control, the soil should be prepared for the seed. This can be done in various ways. For small spots, a hand rake can be used to roughen up the soil before the seed is applied.
A verticut machine has solid vertical blades that can be set to cut furrows in the soil. It is best to go two different directions with the machine. A slit seeder is a verticut machine with a seed hopper added so the soil prep and seeding operation are combined. Another option is to use a core aerator.
The core aerator will punch holes in the soil and deposit the soil cores on the surface of the ground. Each hole produces an excellent environment for seed germination and growth. Make three to four passes with the core aerator to ensure enough holes for the seed. Using a core aerator has the additional benefit of reducing the amount of watering needed to get the seed germinated and growing. Aeration also increases the water infiltration rate, decreases compaction, and increases the amount of oxygen in the soil.
If the three methods, I prefer the slit seeder for obtaining good seed/soil contact. However, if watering is difficult, core aeration may be a better option. Regardless of method used, fertilize should be applied at the rate suggested by a soil test, or a starter fertilizer should be used at the rate suggested on the bag. (Ward Upham)
Power Raking and Core-Aeration

September is the optimum time to power rake or core-aerate tall fescue and Kentucky bluegrass lawns. These grasses should be coming out of their summer doldrums and beginning to grow more vigorously. This is a good time to consider what we are trying to accomplish with these practices.
Power raking is primarily a thatch control operation. It can be excessively damaging to the turf if not done carefully. For lawns with one-half inch of thatch or less, I don’t recommend power raking but rather core aeration. For those who are unsure what thatch is, it is a springy layer of light-brown organic matter that resembles peat moss and is located above the soil but below the grass foliage. Power raking pulls up an incredible amount of material that then must be dealt with by composting or discarding.
Core-aeration is a much better practice for most lawns. By removing cores of soil, core-aeration relieves compaction, hastens thatch decomposition, and improves water, nutrient, and oxygen movement into the soil profile. This operation should be performed when the soil is just moist enough so that it crumbles easily when worked between the fingers. Enough passes should be made so that the holes are spaced about 2 to 3 inches apart. Ideally, the holes should penetrate 2.5 to 3 inches deep. The cores can be left on the lawn to decompose naturally (a process that usually takes two or three weeks, depending on soil-type), or they can be broken up with a power rake set just low enough to nick the cores, and then dragged with a section of chain-link fence or a steel doormat. The intermingling of soil and thatch is beneficial to the lawn. (Ward Upham)
Flowers:
Dividing Peonies

Peonies are a favorite perennial of gardeners because of their beauty and low maintenance. In Kansas, peonies provide a beautiful display of flowers each spring before Memorial Day. Though peonies can be left in place indefinitely, many gardeners wish to increase their plantings and use a process known as division to accomplish this. Keep in mind, however, that peonies often take about three years to return to full bloom and size after division.
Fall is the traditional time to divide these plants. Peonies are essentially dormant by mid-August even though the foliage is still green. The first step in division is to remove the foliage. Then dig out the entire plant. Shake and wash off as much soil as possible so that the pink buds or "eyes" are visible. Peony roots are tough, and a sharp knife is needed to cut the roots into separate pieces. Make sure each division has three to four buds. Make sure the location chosen for planting receives at least a half-day of full sun. However, the more sun, the better. Space the plants so that there is at least 2 feet between dwarf types and 4 feet between the standard types.
Follow the same rules for planting these divisions as you do for new plants. Make sure the pink buds are about 1 inch below the soil surface. If they are set more than 2 inches deep, flowering may be delayed or completely prevented. As you set the plants, firm soil often as it is added around the plant. If the soil is not firmed, it can settle and pull the plant down with it. Water in well after planting and water as necessary through the fall and winter to keep the soil moist.
It is often a good idea to add mulch to the new planting to protect it from heaving. The alternate freezing and thawing that commonly occurs during Kansas winters can "heave" weakly rooted plants out of the ground. Add a mulch of straw, leaves, compost or other material after the soil freezes. Remember, it is not the cold that harms these plants but the alternate freezing and thawing of the soil. (Ward Upham)
Miscellaneous:
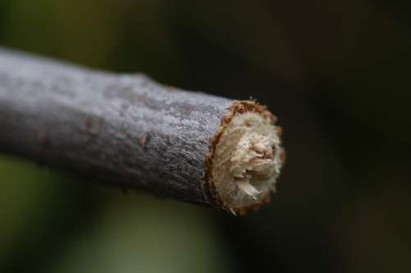
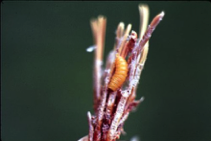
Twig Dieback on Oak
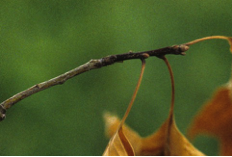
Recently we have seen twig dieback on pin and other oaks caused by a fungal disease called Botryosphaeria canker. Affected trees show wilting or “flagging” of terminal growth on the ends of branches. Dieback usually extends 4 to 6 inches down the twig with leaves bending back toward the twig before turning brown. Dead leaves remain attached to the tree. If you look closely at the twig, you should see a rather marked transition from healthy to diseased tissue. Take a knife and scrape away some of the outer bark tissue. Healthy tissue is light green. Diseased tissue tends to be brown to black.
Botryosphaeria canker differs from oak wilt in that only the tips of branches are affected. Oak wilt affects whole branches. This disease causes such minor damage that chemical control measures are unwarranted. Dead twigs on small trees may be pruned off if desired. (Ward Upham)
Botryosphaeria canker differs from oak wilt in that only the tips of branches are affected. Oak wilt affects whole branches. This disease causes such minor damage that chemical control measures are unwarranted. Dead twigs on small trees may be pruned off if desired. (Ward Upham)
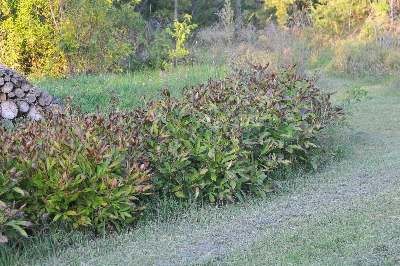
Spring Flowering Shrubs

August through September is the time period our spring-flowering shrubs set flower buds. Therefore, watering, as needed, at this time can help with next spring’s bloom. Examples of spring-flowering shrubs include Forsythia, Flowering Quince, Almond, Beautybush, Deutzia, Pyracantha, Lilac, Mock Orange, Cotoneaster, Weigela, Viburnum and Witchhazel. (Ward Upham)
Contributors: Ward Upham, Extension Associate
Contributors: Ward Upham, Extension Associate


 RSS Feed
