Probably the last thing most gardeners are thinking of now is planting vegetables. However, fall gardens will often produce higher quality, tastier cool-season crops as the vegetable mature during cooler, less stressful temperatures.
Plant slightly deeper than you would in the spring so the seed stays cooler and the soil around the seed stays moist longer. Plant more thickly and thin later. The plants may need to be protected from rabbits through the use of fencing.
Following is a “calendar” of what to do when.
Mid-July: Plant potatoes if you can find or have saved back seed potatoes. Do not use freshly dug potatoes as they have a built-in dormancy that will prevent growth. Also, grocery store potatoes are often treated so they don’t sprout.
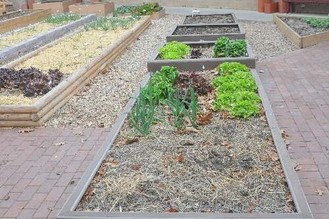
Cabbage, broccoli, and cauliflower can be started from seed at this time. Choose a protected place where the soil can be kept moist and rabbits will not bother them. This will not be where they will grow the entire season but these crops will be transplanted about mid-August.
Late July: Seed beets, carrots and beans.
Late July to Early August: Seed spinach and long-season maturing lettuce. Leaf lettuce will be seeded later.
Second Week of August: Transplant cabbage, broccoli and cauliflower to their final location. Mid to Late August: Seed radishes and leaf lettuce.
Use light amounts of fertilizer before planting. For example, apply 1/4 cup of a low-analysis fertilizer (6-7-7) per 10 feet of row. Sidedress two weeks after transplanting or four weeks after sowing seed by applying 2 tablespoons of a 16-0-0 or 1 tablespoon of a 27-3-3, 30-3-4 fertilizer, or something similar per plant.
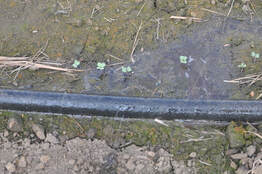
Watering must occur more frequently because seed should not be allowed to dry out. Overhead watering often causes soil to crust, making it more difficult for young, tender plants to emerge. Prevent this by applying a light sprinkling of peat moss, vermiculite or compost directly over the row after seeding. Even better, use a soaker hose or drip irrigation right next to the row to allow water to slowly seep into the ground. (Ward Upham)
Plant slightly deeper than you would in the spring so the seed stays cooler and the soil around the seed stays moist longer. Plant more thickly and thin later. The plants may need to be protected from rabbits through the use of fencing.
Following is a “calendar” of what to do when.
Mid-July: Plant potatoes if you can find or have saved back seed potatoes. Do not use freshly dug potatoes as they have a built-in dormancy that will prevent growth. Also, grocery store potatoes are often treated so they don’t sprout.
Cabbage, broccoli, and cauliflower can be started from seed at this time. Choose a protected place where the soil can be kept moist and rabbits will not bother them. This will not be where they will grow the entire season but these crops will be transplanted about mid-August.
Late July: Seed beets, carrots and beans.
Late July to Early August: Seed spinach and long-season maturing lettuce. Leaf lettuce will be seeded later.
Second Week of August: Transplant cabbage, broccoli and cauliflower to their final location. Mid to Late August: Seed radishes and leaf lettuce.
Use light amounts of fertilizer before planting. For example, apply 1/4 cup of a low-analysis fertilizer (6-7-7) per 10 feet of row. Sidedress two weeks after transplanting or four weeks after sowing seed by applying 2 tablespoons of a 16-0-0 or 1 tablespoon of a 27-3-3, 30-3-4 fertilizer, or something similar per plant.
Watering must occur more frequently because seed should not be allowed to dry out. Overhead watering often causes soil to crust, making it more difficult for young, tender plants to emerge. Prevent this by applying a light sprinkling of peat moss, vermiculite or compost directly over the row after seeding. Even better, use a soaker hose or drip irrigation right next to the row to allow water to slowly seep into the ground. (Ward Upham)


 RSS Feed
