Video of the Week:
Protecting Fruit Trees from Deer
Flowers:
Time to Plant Spring-flowering Bulbs
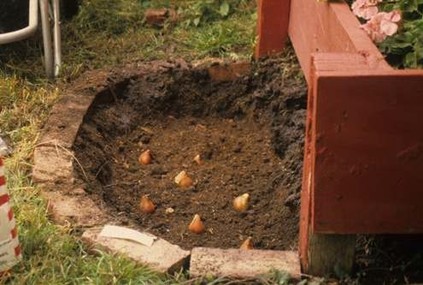
Late September through October is an excellent time to plant spring-flowering bulbs such as crocus, tulips, and daffodils. These plants need to develop roots in the fall and must meet a chilling requirement over the winter in order to bloom in the spring.
Choose a planting site that has full sun to partial shade. The ideal soil would be a sandy loam, but even poor soils can be used if organic material such as peat moss, compost, or aged bark is mixed in. For example, a heavy clay can be amended by mixing in one-third to one-half organic material. Soil pH should be between 6.0 and 7.0.
Bulbs need good aeration as well as good drainage for proper development. It is best if the bulbs are given 12 inches of prepared soil. If one-third organic material were added, this would require mixing 4 inches of organic material with 8 inches of soil. Incorporate about 3 pounds of a complete fertilizer such as a 5-10-5 per 100 square feet during preparation or fertilize according to soil test.
Planting depths vary depending on the size of the bulbs. For example, tulips and hyacinths are set about 6 inches deep, and daffodils are put 6 to 8 inches deep. Smaller bulbs are planted shallower. As a rule of thumb, bulbs are planted two to three times as deep as their width. Planting depth is the distance from the bottom of the bulb to the top of the soil. Large bulbs are normally spaced 4 to 6 inches apart, and small bulbs about 1 to 2 inches. Planting in clumps or irregular masses produces a better display than planting singly.
After placing the bulbs at the proper depth, replace half the soil and add water. This will settle the soil around the bulbs and provide good bulb/soil contact. Add the remaining soil and water again. Although there will be no top growth in the fall, the roots are developing, so soil needs to be kept moist but not soggy. Mulch can be added after the soil has frozen to prevent small bulbs from being heaved out of the soil by alternate freezing and thawing. (Ward Upham)
Vegetables:
Rotation of Vegetable Crops
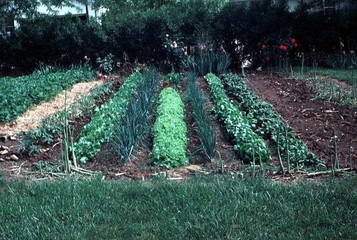
Rotating vegetable crops is a standard way of helping prevent disease from being carried over from one year to the next. Rotation means that crops are moved to different areas of the garden each year. Planting the same crop, or a related crop, in the same area each year can lead to a build-up of disease. Also, different crops vary in the depth and density of the root system as well as extract different levels of nutrients. As a rule, cool-season crops such as cabbage, peas, lettuce and onions have relatively sparse, shallow root systems and warm-season crops such as tomatoes, peppers and melons have deeper, better developed root systems. Therefore, it can be helpful to rotate warm-season and cool-season crops.
As mentioned earlier, it is also a good idea to avoid planting closely related crops in the same area as diseases may be shared among them. For example, tomatoes, potatoes, peppers and eggplant are closely related. Also, broccoli, cauliflower, cabbage and brussels sprouts share many characteristics in common. Therefore, do not plant cabbage where broccoli was the previous year or tomatoes where the peppers were.
So, why is this important to bring this up in the fall? Now is the time to make a sketch of your garden so that the layout is not forgotten when it is time to plant next year. (Ward Upham)
Ornamentals:
Planting Trees in the Fall
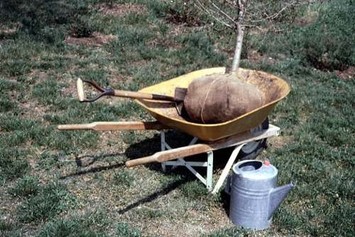
The fall season can be an excellent time to plant trees. During the spring, soils are cold and may be so wet that low oxygen levels inhibit root growth. The warm and moist soils associated with fall encourage root growth. Fall root growth means the tree becomes established well before a spring-planted tree and is better able to withstand summer stresses. However, certain trees do not produce significant root growth during the fall and are better planted in the spring. These include beech, birch, redbud, magnolia, tulip poplar, willow oak, scarlet oak, black oak, willows, and dogwood.
Fall-planted trees require some special care. Remember, that roots are actively growing even though the top is dormant. Make sure the soil stays moist but not soggy. This may require watering not only in the fall but also during the winter months if we experience warm spells that dry the soil. Mulch also is helpful because it minimizes moisture loss and slows the cooling of the soil so root growth continues as long as possible. Evergreens should be moved earlier in the fall than deciduous plants. They need at least six weeks before the ground freezes for the roots to become established. (Ward Upham)
Fall-planted trees require some special care. Remember, that roots are actively growing even though the top is dormant. Make sure the soil stays moist but not soggy. This may require watering not only in the fall but also during the winter months if we experience warm spells that dry the soil. Mulch also is helpful because it minimizes moisture loss and slows the cooling of the soil so root growth continues as long as possible. Evergreens should be moved earlier in the fall than deciduous plants. They need at least six weeks before the ground freezes for the roots to become established. (Ward Upham)
Miscellaneous:
Adding Organic Materials Directly to the Garden
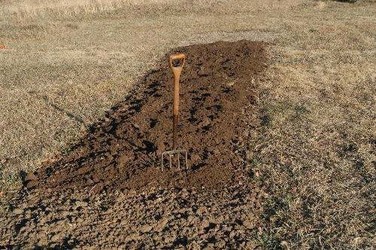
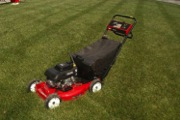
If the summer weather has brought an early end to your garden, consider adding organic materials directly to the soil rather than composting. Materials such as residue from lawn renovation, rotted hay, or rotted silage can be added and then tilled in. Coarser materials such as tree leaves or garden residue should be shredded. A lawn mower with a bagging attachment can be used to shred this material and collect it in one operation.
Organic materials can be spread to a depth of about 3 inches and tilled in. Be sure the soil is not too wet before tilling. During warm weather, the material will decompose quickly and the process can be repeated every two weeks. Later in the fall, it may take longer. This process can be repeated from now until late November to early December.
Remember that organic matter helps almost any soil. It improves clay soil by improving tilth, aeration and how quickly the soil takes up water. In sandy soils, it acts as a sponge by holding water and nutrients. (Ward Upham)
Moving Houseplants Inside for the Winter
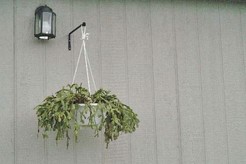
Many people with houseplants move some of them outside for the summer to give them better growing conditions and help them recover from the stress of an indoor environment. But as fall approaches and night temperatures approach 50 F, it is time to think about bringing plants inside for the winter. Plants that have spent the summer outside should be inspected for insects and disease before bringing them inside. A sharp spray from a garden hose can remove insects or mites from houseplant foliage. Insects in the potting soil can be forced out by soaking the pot in a tub of lukewarm water for about 15 minutes.
Houseplants that have been kept outdoors are accustomed to receiving much more sunlight than they do indoors. So how do we help houseplants acclimatize to the lower light levels inside? Houseplants brought in from outside should be started out in an area of the home that receives plenty of light, and then gradually moved to their permanent, darker location. This process should take four to eight weeks depending on the degree of difference in light levels between the initial and final location of the plant.
Understanding plant processes allows us to anticipate potential problems. Acclimatization gives houseplants a greater chance of retaining leaves and avoiding the stress of completely replacing them. (Ward Upham)
Pests:
Itch Mites are Back

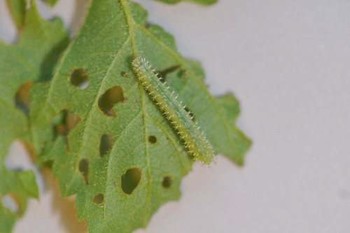
Last year was a bad year for itch mites. It looks like 2016 may be bad as well. These arthropods are responsible for painful bites that result in itching on people. The mites are barely visible to the naked eye but their bite results in a noticeable raised red area with a centralized blister. It normally takes 10 to 16 hours for itching to start after exposure. Unlike chigger bites which are usually restricted to areas where clothing is tight such as belts, underwear or socks, oak leaf itch mite bites appear where clothing is loose such as at the neck, shoulder and chest.
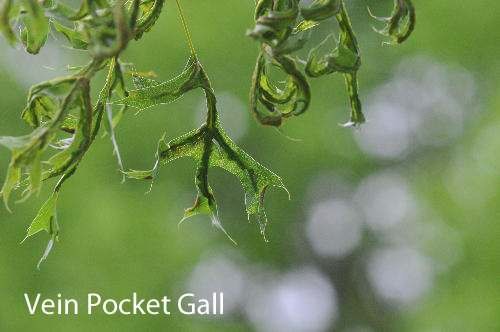
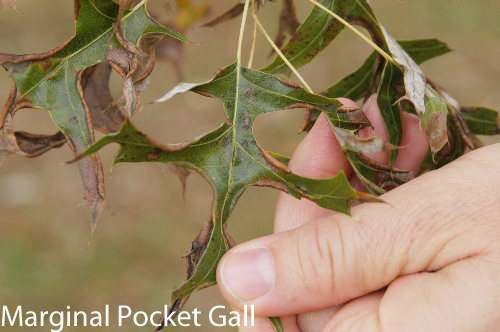
Oak leaf itch mites feed on insect larvae living within straw, seeds and plant galls. In recent outbreaks, itch mites have been feeding on midge larvae which cause gall formation on the margins of certain oak leaves. Pin oaks are most likely affected but red oaks and black oaks can also act as a host for the midges. The female mite is able to enter the gall through small openings and paralyze the midge larvae with a neurotoxin. The midge then acts as a food source for the mite allowing her to develop about 200 offspring. It takes about a week for the new mites to emerge. Only about 5 to 10 percent of the progeny are males. The males do not feed but mate and then die. Females seek new hosts on the existing tree but can be carried by winds for hundred of yards. Mite populations appear in late July and continue through the summer and into the fall.
No effective control has been found. Deet-based repellents have not given consistent results. Tree sprays are ineffective as the mites are protected by the galls. Oak trees known to be infested with mites should be avoided. If work must be done near oak trees with marginal leaf gall, bathing and changing and washing clothing is recommended. This article was adapted from our publication MF2806, “Oak Leaf Itch Mite.” (Ward Upham)
Contributors: Ward Upham, Extension Associate


 RSS Feed
