Video of the Week:
How to Make a Grow Light
Vegetables:
Planting Asparagus
Though it is too early to plant asparagus, it is not too early to make plans and prepare soil. This crop is a perennial and will survive for many years if given proper care. It prefers full sun and a well-drained soil and is usually placed on the edge of the garden area so that there is no need to till around the area to plant other crops.
Proper soil prep is especially important for perennial crops. Take a soil test to ensure proper levels of nutrients. Click here for the correct procedure. Take the soil sample into your local extension office (see http://www.ksre.ksu.edu/Map.aspx) for analysis. Work the soil as early in the spring as possible but do not work wet soil as clods will form. Then add two inches of organic matter to the surface and the fertilizer and work again so the organic matter and fertilizer are blended into the soil.
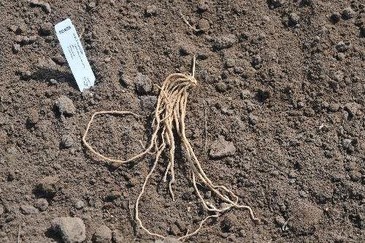
Asparagus can be propagated from seed but is more often started from 1-year-old crowns. These crowns are planted deeply; about 8 inches deep either in a hole for each crown or in a trench. Space plants 18 to 24 inches apart. Fill in the trench gradually over the growing season to encourage growth. March 15 to April 15 is the best planting time. Adapted varieties include Jersey Giant, Jersey King, Jersey Knight, Jersey Supreme and Purple Passion. These are all male hybrids that will produce three times as much as our old Martha or Mary Washington varieties. Males have a number of advantages over females in that they live longer, emerge earlier in the spring, are more productive and eliminate potential volunteer plants that can reduce the productivity of a planting.
Weed control is very important. Competition with weeds results in slow establishment. A shallow hoeing should be all that is needed. (Ward Upham)
Proper soil prep is especially important for perennial crops. Take a soil test to ensure proper levels of nutrients. Click here for the correct procedure. Take the soil sample into your local extension office (see http://www.ksre.ksu.edu/Map.aspx) for analysis. Work the soil as early in the spring as possible but do not work wet soil as clods will form. Then add two inches of organic matter to the surface and the fertilizer and work again so the organic matter and fertilizer are blended into the soil.
Asparagus can be propagated from seed but is more often started from 1-year-old crowns. These crowns are planted deeply; about 8 inches deep either in a hole for each crown or in a trench. Space plants 18 to 24 inches apart. Fill in the trench gradually over the growing season to encourage growth. March 15 to April 15 is the best planting time. Adapted varieties include Jersey Giant, Jersey King, Jersey Knight, Jersey Supreme and Purple Passion. These are all male hybrids that will produce three times as much as our old Martha or Mary Washington varieties. Males have a number of advantages over females in that they live longer, emerge earlier in the spring, are more productive and eliminate potential volunteer plants that can reduce the productivity of a planting.
Weed control is very important. Competition with weeds results in slow establishment. A shallow hoeing should be all that is needed. (Ward Upham)
Soil Temperature and Vegetables
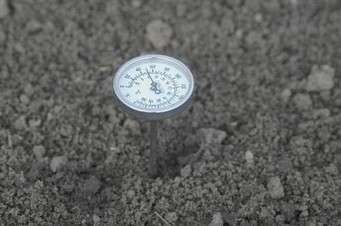
One of the most neglected tools for vegetable gardeners is a soil thermometer. Soil temperature is a much better measure of when to plant than air temperature or the calendar. Planting when soil is too cool can cause seeds to rot and transplants to refuse to grow.
A number of vegetables can germinate and grow at cool temperatures. For example, peas will germinate and grow well at a soil temperature of 40 F. Though lettuce, parsnips, and spinach can sprout at a soil temperature of 35 F, they prefer at least 45 F for best germination and growth. Radishes also do well at a soil temperature of 45 F. Warm-season crops such as tomatoes, sweet corn and beans prefer at least 55 F for germination (or transplanting), but others such as peppers, cucumbers, melons and sweet potatoes need it even warmer, about 60 F.
Taking soil temperature accurately is a bit of a science. First, use a metal soil thermometer, which is sold in many garden and hardware stores. Take temperature 2.5 inches deep at about 10 to 11 a.m. Temperature variations throughout the day and night affect soil temperature, with lowest readings after dawn and warmest around mid-afternoon. The late-morning reading gives a good average temperature. If taking the soil temperature at this time is not practical, take a reading before you leave for work and a second when you return home and use the average. Also be sure to get a consistent reading for four to five days in a row before planting, and make sure a cold snap is not predicted.
An excellent guide sheet on this subject is published by the Alabama Cooperative Extension System and is titled “Soil Temperature Conditions for Vegetable Seed Germination.” It can be found at http://www.aces.edu/pubs/docs/A/ANR-1061/ANR-1061.pdf (Ward Upham)
Fruit:
What Fruit Trees to Plant?
If you’re pondering that question, here are some comments on fruit trees commonly grown in Kansas. Fruit trees are a long-term investment requiring careful thought before purchase. Begin by choosing fruit you will eat, not fruit that appears attractive in the catalog. Other considerations are outlined below. Space doesn’t allow for a complete list in this newsletter. For more choices, go to the publication “Small- and Tree-Fruit Cultivars” at http://www.ksre.ksu.edu/bookstore/pubs/MF1028.pdf. You may also request this publication from your local K-State Research and Extension office.
Apples: Though we can grow a wide variety of apples in Kansas, pest-free fruit requires an extensive spray program. Apples are normally sprayed from March (dormant spray) until about two weeks before harvest. Sprays from April on throughout the growing season are applied at least every two weeks.
You need two different varieties of apples to produce fruit. Recommended varieties include Jonathan, Gala, Empire, Delicious, Golden Delicious, Jonagold, and Granny Smith. Recommended apples that are disease resistant include William's Pride, Enterprise, Priscilla, and Redfree. Planting disease-resistant apples will reduce, but not eliminate, the need for pesticide applications. None of the apple varieties listed above are resistant to the summer apple diseases sooty blotch and flyspeck. It may be necessary to periodically apply a fungicide in the summer to suppress these fruit blemishing diseases. Also, all of the varieties listed will require protection from codling moth and other insect pests. The codling moth larva is the most common “worm”
in the apple.
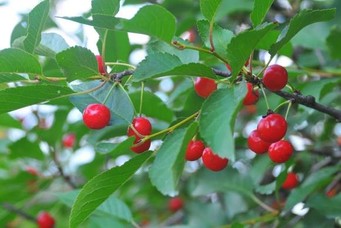
Cherries: Sweet cherries (such as Bing) are not well adapted to Kansas, but sour (pie) cherries are. Cherries are borne in June, so relatively few sprays are needed. Many years you may get by with no sprays at all. Only one tree variety is needed for fruit on sour cherries. Recommended sour cherries are Montmorency, Meteor, and North Star. The latter two are genetic dwarfs with Meteor reaching 10 to 14 feet and North Star growing to 8 to 10 feet.
Apricots: Apricot trees are quite ornamental, which is fortunate because late spring frosts usually eliminate fruit. On average, assume you will get fruit about once every 5 to 10 years. Portions of western Kansas may see fruit only once every 30 years. Almost all varieties of apricot are self-fruitful. Recommended varieties include Moorpark, Goldcot, Manchu, and Superb.
Peaches: Usually a relatively short-lived tree (10 to 12 years) that needs a great deal of pruning to keep productive. Peaches have the same problem with late frosts that apricots do but may not be quite as sensitive. Only one tree is needed for fruit. Try Intrepid, Early Redhaven, Redhaven, Harken, and Reliance. Intrepid blooms later than other peaches and blooms are much more frost resistant.
Pears: Pears are tough and are often one of the few trees that survive on an old homestead. Though trees should be sprayed, the chance of getting good fruit without spraying is much better than it is with apples. Usually, two trees are needed to get fruit. Proven pears include Seckel, Moonglow, and Duchess.
To learn how to control fruit pests see, “Fruit Pest Control for Home Gardens,” at http://www.ksre.ksu.edu/bookstore/pubs/c592.pdf or available from local K-State Research and Extension offices. (Ward Upham)
Apples: Though we can grow a wide variety of apples in Kansas, pest-free fruit requires an extensive spray program. Apples are normally sprayed from March (dormant spray) until about two weeks before harvest. Sprays from April on throughout the growing season are applied at least every two weeks.
You need two different varieties of apples to produce fruit. Recommended varieties include Jonathan, Gala, Empire, Delicious, Golden Delicious, Jonagold, and Granny Smith. Recommended apples that are disease resistant include William's Pride, Enterprise, Priscilla, and Redfree. Planting disease-resistant apples will reduce, but not eliminate, the need for pesticide applications. None of the apple varieties listed above are resistant to the summer apple diseases sooty blotch and flyspeck. It may be necessary to periodically apply a fungicide in the summer to suppress these fruit blemishing diseases. Also, all of the varieties listed will require protection from codling moth and other insect pests. The codling moth larva is the most common “worm”
in the apple.
Cherries: Sweet cherries (such as Bing) are not well adapted to Kansas, but sour (pie) cherries are. Cherries are borne in June, so relatively few sprays are needed. Many years you may get by with no sprays at all. Only one tree variety is needed for fruit on sour cherries. Recommended sour cherries are Montmorency, Meteor, and North Star. The latter two are genetic dwarfs with Meteor reaching 10 to 14 feet and North Star growing to 8 to 10 feet.
Apricots: Apricot trees are quite ornamental, which is fortunate because late spring frosts usually eliminate fruit. On average, assume you will get fruit about once every 5 to 10 years. Portions of western Kansas may see fruit only once every 30 years. Almost all varieties of apricot are self-fruitful. Recommended varieties include Moorpark, Goldcot, Manchu, and Superb.
Peaches: Usually a relatively short-lived tree (10 to 12 years) that needs a great deal of pruning to keep productive. Peaches have the same problem with late frosts that apricots do but may not be quite as sensitive. Only one tree is needed for fruit. Try Intrepid, Early Redhaven, Redhaven, Harken, and Reliance. Intrepid blooms later than other peaches and blooms are much more frost resistant.
Pears: Pears are tough and are often one of the few trees that survive on an old homestead. Though trees should be sprayed, the chance of getting good fruit without spraying is much better than it is with apples. Usually, two trees are needed to get fruit. Proven pears include Seckel, Moonglow, and Duchess.
To learn how to control fruit pests see, “Fruit Pest Control for Home Gardens,” at http://www.ksre.ksu.edu/bookstore/pubs/c592.pdf or available from local K-State Research and Extension offices. (Ward Upham)
Fertilizing Spring-flowering Bulbs
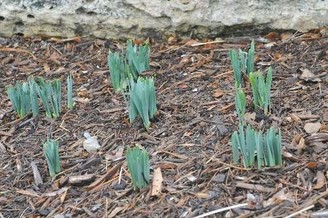
The best time to fertilize spring-flowering bulbs is when foliage emerges in the spring rather than at flowering. Traditionally, gardeners have applied fertilizer during bloom or a bit after, but because bulb roots start to die at flowering, fertilizer applied at bloom is wasted. Roots are active when the foliage first pokes through the ground.
Nutrients applied then help the plant produce flowers the following year. If bulbs have been fertilized in the past, there are often plenty of phosphorus and potassium in the soil. It is best to use a soil test to be certain. If the soil needs phosphorus and potassium, use a complete fertilizer (such as 10-10-10, 9-9-6, etc.) at the rate of 2.5 lbs. per 100 square feet. This would equal 1 rounded teaspoon per square foot. If phosphorus and potassium are not needed, blood meal makes an excellent fertilizer. It should be applied at the rate of 2 lbs. per 100 square feet or 1 teaspoon per square foot. Lawn fertilizers such as a 27-3-3 or 30-3-3 can be used, but cut the rate by a third. Also make sure the lawn fertilizer does not contain a weed preventer or weed killer.
Remember to leave the foliage until it dies naturally. The energy in the foliage is transferred to the bulb as the foliage dies and will help bloom next year. (Ward Upham)
Miscellaneous:
An Easy Way to Propagate Houseplants

Houseplant growers don’t need a lot of equipment to propagate a houseplant. Gardeners can get by with a coffee cup, potting soil, 3 drinking straws, a plastic bag and a rubber band. Start by making a slit or hole in the bottom of the coffee cup so that it drains excess water. Then fill the cup with moist potting soil. Do not use garden soil as it does not drain well. Too much water (and too little oxygen) will harm cuttings.
Prepare the Cutting
- Remove about a 4-inch or smaller piece from the tip of the plant. The cut should be made just below a node. A node is where a leaf attaches to the stem.
- Remove the leaf or leaves from the bottom node. This is where roots will form.
- If there are just a few leaves on the tip, fine. However, if there is a cluster of leaves, remove most of them below the tip. This will cut down on water loss as the plant makes new roots.
Plant the Cutting
- Push the bottom end of the cutting into the soil. The remaining leaves should not contact the soil. A rooting hormone may be used if desired but usually is unnecessary with houseplants.
Make a Greenhouse
- Place 3 straws equidistant from each other near the outside edge the cup full of potting soil. They will support the plastic bag so that it does not contact the leaves and cause them to rot.
- Place the plastic bag over the cup like a tent and use the rubber band to secure the open end of the bag to the sides of the cup.
Grow the Cutting
- Place the cutting in bright, indirect light. Do not place in full sunlight as the cutting may overheat.
- Keep the cutting warm. A temperature of 72 degrees is ideal. Roots should form in about 10 days. Check by removing the plastic bag and pulling gently on the cutting. If it doesn’t pull out easily, roots have started to form and the plastic bag can be left off. (Ward Upham)
Leaching Houseplants
Everyone knows that someone stranded in the ocean should not drink the water. The salt content of that water will make a bad situation worse. What many people don’t realize is that this same principle can harm plants.
Fertilizers are salts. They must be salts in order for the plant roots to take them up. However, salt levels can build up over time and eventually may harm plant roots leading to scorched leaves and unhealthy plants. Though this can happen under field conditions, especially in low rainfall areas, it is particularly critical with houseplants.
Houseplants have a certain soil volume that doesn’t change until a plant is repotted. Salt build-up can be a crucial concern especially if plants are fertilized heavily. Leaching an overabundance of salts can be an important practice to ensure the health of our houseplants. Leaching is not a complicated or difficult process. It consists of adding enough water to wash out excess salts. How much water is enough? Add the amount of water that would equal twice the volume of the pot. This, of course, would need to be done outside or in a bathtub or sink. Water must be added slowly so that it doesn’t overflow the rim of the pot. If salt has formed a crust on the surface of the soil, remove it but don’t take more than 1/4 inch of the underlying media. This may also be a good time to repot the plant. (Ward Upham)
Contributors: Ward Upham, Extension Associate
 RSS Feed
