Video of the Week:
Plant Amaryllis Bulbs for Winter Color
Ornamentals:
Pruning Shrubs
Recently, we have received a number of calls from gardeners wanting to cut back shrubs. Though light pruning and removal of dead wood are fine this time of year, severe pruning should be left until spring. Keep in mind that even light pruning of spring-blooming shrubs such as lilac and forsythia will reduce flowers for next year. We normally recommend that spring-bloomers be pruned after flowering.
Shrubs differ in how severely they can be cut back. Junipers do not break bud from within the plant and therefore should be trimmed lightly if you wish to keep the full shape. Overgrown junipers should be removed. On the other hand, there are certain shrubs that can be pruned back severely during the spring. Rejuvenation is the most severe type of pruning and may be used on multi-stem shrubs that have become too large with too many old branches to justify saving the younger canes. All stems are cut back to 3- to 5-inch stubs. This works well for spirea, forsythia, pyracantha, ninebark, Russian almond, little leaf mock orange, shrub roses, and flowering quince. Just remember that spring is the correct time to do this, not now. (Ward Upham)
Shrubs differ in how severely they can be cut back. Junipers do not break bud from within the plant and therefore should be trimmed lightly if you wish to keep the full shape. Overgrown junipers should be removed. On the other hand, there are certain shrubs that can be pruned back severely during the spring. Rejuvenation is the most severe type of pruning and may be used on multi-stem shrubs that have become too large with too many old branches to justify saving the younger canes. All stems are cut back to 3- to 5-inch stubs. This works well for spirea, forsythia, pyracantha, ninebark, Russian almond, little leaf mock orange, shrub roses, and flowering quince. Just remember that spring is the correct time to do this, not now. (Ward Upham)
Ornamental Grasses
Ornamental grasses have really caught my eye this fall. The way the morning and evening light glitters through the seedheads is just gorgeous.
Never before have there been so many varieties of ornamental grasses from which to choose. Breeders are selecting for landscape performance, foliage color, seed head size and plant size. I think the most interesting feature of most ornamental grasses is the seed head, but foliage color is a close second. There are some newer varieties with deep purple leaves and names like ‘Hot Rod,’ ‘Fireworks’ and ‘Heavy Metal.’
Versatile is the word of choice for this category of plants. They can take tough sites, full sun and little nutrients or water (once established). Many are very tall and can screen unsightly features in the landscape, while others are short and (let me say it) cute. Yes, cute. Have you seen ‘Little Bunny’ pennisetum? Adorable. Plant enthusiasts are allowed to call plants adorable, you know.
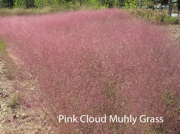
What about ‘Blonde Ambition’ blue grama grass? Oh yeah. This one is spunky and super cool. ‘Pink Cloud’ muhly grass is literally a cloud of pink blooms. These plants all look great planted en masse as well as in containers.
There are really only 3 simple things to remember about growing ornamental grasses in your landscape: planting time, trimming time and division time.
Planting time is most of the year except for winter. Plant once the danger of frost has passed in the spring, up until the end of September. If you plant them any later than that, it’s really too late. They don’t have adequate time to establish a strong root system and are in real danger of dying when cold weather hits. Better to wait until your investment can grow enough during the growing season to survive the winter (which they do very well, just need time to establish).
I have a bone to pick about trimming time. One of the main attributes I’m focusing on in this article is the seedheads of ornamental grasses. They certainly look their best right now, but they will also continue to look great for the next 6 months or so. This is their time to shine—winter interest is a main feature of ornamental grasses. Therefore…don’t cut them back until February or March as winter is ending and spring is beginning. I have seen far too many grasses cut back in their prime when it’s absolutely not needed. Grasses need to be trimmed to 6-8 inches in the
spring in order to let the fresh new growth get through the old biomass. Now, this is where it gets manly, I tell ya. Trimming ornamental grasses requires gloves, long sleeves and serious tools. If your grasses are really big, like Pampas Grass, you might even want a chainsaw and chaps. If smaller, you can probably get away with pruners or hedge trimmers. Compost all that good biomass for organic matter later in the year.
Division time is another time for manly tools. Every 3 to 4 years it’s a good idea to divide most ornamental grasses. By then, the center may start to die out and the plants begin to look somewhat unattractive as a clump. How do you divide grass clumps? With shovels and saws and axes. And maybe a machete—we use those in horticulture more often that you would imagine [side note: Can I have one for Christmas?]. Dig those plants out and redistribute them or give them away. I’ve even seen folks try to get rid of their divisions on Craigslist. Hey, worth a look if you want some plants for free!
This holiday season, consider glamming it up with the gift of glitter (gift certificate for planting ornamental grasses) and “tooling“ it up Tim Taylor Tool Time Style with some manly gardening tools. You already know what’s on my list. (Cheryl Boyer)
Never before have there been so many varieties of ornamental grasses from which to choose. Breeders are selecting for landscape performance, foliage color, seed head size and plant size. I think the most interesting feature of most ornamental grasses is the seed head, but foliage color is a close second. There are some newer varieties with deep purple leaves and names like ‘Hot Rod,’ ‘Fireworks’ and ‘Heavy Metal.’
Versatile is the word of choice for this category of plants. They can take tough sites, full sun and little nutrients or water (once established). Many are very tall and can screen unsightly features in the landscape, while others are short and (let me say it) cute. Yes, cute. Have you seen ‘Little Bunny’ pennisetum? Adorable. Plant enthusiasts are allowed to call plants adorable, you know.
What about ‘Blonde Ambition’ blue grama grass? Oh yeah. This one is spunky and super cool. ‘Pink Cloud’ muhly grass is literally a cloud of pink blooms. These plants all look great planted en masse as well as in containers.
There are really only 3 simple things to remember about growing ornamental grasses in your landscape: planting time, trimming time and division time.
Planting time is most of the year except for winter. Plant once the danger of frost has passed in the spring, up until the end of September. If you plant them any later than that, it’s really too late. They don’t have adequate time to establish a strong root system and are in real danger of dying when cold weather hits. Better to wait until your investment can grow enough during the growing season to survive the winter (which they do very well, just need time to establish).
I have a bone to pick about trimming time. One of the main attributes I’m focusing on in this article is the seedheads of ornamental grasses. They certainly look their best right now, but they will also continue to look great for the next 6 months or so. This is their time to shine—winter interest is a main feature of ornamental grasses. Therefore…don’t cut them back until February or March as winter is ending and spring is beginning. I have seen far too many grasses cut back in their prime when it’s absolutely not needed. Grasses need to be trimmed to 6-8 inches in the
spring in order to let the fresh new growth get through the old biomass. Now, this is where it gets manly, I tell ya. Trimming ornamental grasses requires gloves, long sleeves and serious tools. If your grasses are really big, like Pampas Grass, you might even want a chainsaw and chaps. If smaller, you can probably get away with pruners or hedge trimmers. Compost all that good biomass for organic matter later in the year.
Division time is another time for manly tools. Every 3 to 4 years it’s a good idea to divide most ornamental grasses. By then, the center may start to die out and the plants begin to look somewhat unattractive as a clump. How do you divide grass clumps? With shovels and saws and axes. And maybe a machete—we use those in horticulture more often that you would imagine [side note: Can I have one for Christmas?]. Dig those plants out and redistribute them or give them away. I’ve even seen folks try to get rid of their divisions on Craigslist. Hey, worth a look if you want some plants for free!
This holiday season, consider glamming it up with the gift of glitter (gift certificate for planting ornamental grasses) and “tooling“ it up Tim Taylor Tool Time Style with some manly gardening tools. You already know what’s on my list. (Cheryl Boyer)
Fruit:
Winterizing Strawberry Plants
Winter can be a difficult time for strawberries in Kansas. Plants need time to become adjusted to cold weather and will gradually become more cold resistant as fall progresses. Strawberry plants are able to withstand colder temperatures in the middle of the winter than in the fall before they have gone through much cold weather. For example, if temperatures suddenly plummet below 20 degrees F before the plants harden to the cold, they can be severely damaged. A drop to 15 degrees F may kill them. Hardened plants can withstand such temperatures with ease. This lack of hardening off may be a concern this year because of the unseasonably warm fall. If a sudden drop in temperature to below 20 degrees F is forecast, it may be wise to mulch the plants as you would for the winter. After the cold snap is over, uncover the plants so they may continue to harden off.
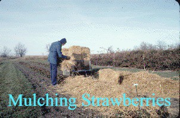
Normally, strawberries should be mulched for the winter around Thanksgiving. However, if temperatures stay abnormally warm, give plants another couple of weeks to become cold hardy before mulching. Mulching plants helps protect strawberries not only from low temperatures but also from heaving damage. Heaving damage occurs when the alternate freezing and thawing common in Kansas winters heave plants out of the ground where the roots are exposed and the plants die from lack of water.
Wheat straw makes good mulch and is widely available. The straw should be spread over the plants to a depth of 3 inches. Shake the slabs of straw apart so there are no large compressed chunks. This straw mulch not only helps protect the plants over winter but can also help avoid damage from late spring frosts by delaying blooming a few days in the spring. Mulch should be removed gradually in the spring as plants begin new growth. Remove enough so leaves can be seen.
Leaving some mulch in place keeps the berries off the ground and conserves moisture. Also, mulch left in the aisles helps protect pickers from muddy conditions. (Ward Upham)
Miscellaneous:
Ashes in the Garden
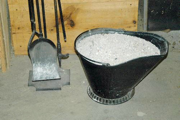
You may have heard that using wood ashes on your garden can help make the soil more fertile. Though ashes do contain significant amounts of potash, they contain little phosphate and no nitrogen. Most Kansas soils are naturally high in potash and do not need more. Also, wood ashes will raise the pH of our soils, often a drawback in Kansas where soils tend toward high pH anyway. Therefore, wood ashes add little benefit, and may harm, many Kansas soils. In most cases it is best to get rid of them. (Ward Upham)
Garden Soil Preparation - It's Not Too Late
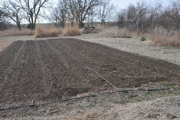
Autumn is an excellent time to add organic materials and till garden soils. Winter can still be a good time to take care of this chore as long as the soil isn’t frozen. It is far wiser to till now than to wait until spring when cold, wet conditions can limit your ability to work soils easily. Working soil when it is wet destroys soil structure and results in hard clods that are very slow to break down. On the other hand, dry soil may need to be watered so it can be more easily tilled. Be sure to wait several days after watering to let soil moisture levels moderate. You want the soil moist, not wet or dry, when tilling.
There is a limit to how much organic material such as leaves can be added in one application. Normally, a layer 2 inches deep is adequate with 5 to 6 inches being the maximum that can be added at one time. Shredding the material before application encourages faster and more complete decomposition due to increased surface area. Remember, soil preparation is an important key to a successful garden. (Ward Upham)
There is a limit to how much organic material such as leaves can be added in one application. Normally, a layer 2 inches deep is adequate with 5 to 6 inches being the maximum that can be added at one time. Shredding the material before application encourages faster and more complete decomposition due to increased surface area. Remember, soil preparation is an important key to a successful garden. (Ward Upham)
High pH Soils and What to Do With Them
Though there are high pH soils in most parts of the state, alkaline soils tend to be more common in the central and western regions of Kansas. These high pH soils can cause problems for plants by reducing the availability of certain micronutrients. For example, most Kansas soils have more than adequate amounts of iron. However, a high pH can make iron unavailable resulting in a condition called iron chlorosis. Iron chlorosis reduces the health of plants by reducing photosynthesis. Lowering the pH of such soils
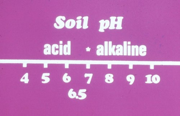
Now would be a good time to have a soil test done to see if your pH is too high. If so, sulfur can be added either now or in the spring to lower the pH. Different textures of soil require different amounts. A sandy soil needs 7 pounds of sulfur per 1,000 square feet to reduce pH one point. A loam soil needs 11 pounds and clay needs 17 pounds to do the same. For example, if you wished to lower pH from 8.5 to 6.5 on a loam soil, you would need 22 pounds of sulfur per 1,000 square feet.
So, what pH do we shoot for? For most plants, a pH between 6.0 and 7.0 is preferred.
Unfortunately, adding sulfur to lower pH is not as clear-cut a solution as we would like. Here are some other factors to keep in mind.
Free calcium carbonate: Some soils have free calcium carbonate, actual particles of limestone mixed in the soil. These "calcareous" soils normally have a pH of 7.3 to 8.5, with 8.2 to 8.3 being most common. In order for us to lower the pH with sulfur, all free calcium carbonate must be neutralized first. A recent soil test showed 6.7 percent free calcium carbonate. One pound of sulfur is needed to neutralize three pounds of calcium carbonate. Assuming 80 pounds for a cubic foot of soil, you would need about 1.75 pounds of sulfur per square foot just to neutralize the free lime. Additional sulfur would be needed to lower pH. Adding this much sulfur to a soil at one time is not recommended.
Not all high pH soils are calcareous. Perform this simple test to see if your soil contains appreciable amounts of free lime. Apply one drop of vinegar to dry soil. A vigorous fizz usually means the soil contains at least 3 percent calcium carbonate. A mild fizz suggests a calcium carbonate of between 1 and 2 percent and a fizz that can only be heard suggests the soil has a calcium carbonate content less than 1 percent.
How sulfur works: Elemental sulfur does not lower pH directly. It must first be oxidized to the sulfate form with the result being sulfuric acid. The sulfuric acid produces hydrogen, which acidifies the soil and lowers pH. The oxidation takes place primarily through microbial activity.
Oxidation takes time: Microbial oxidation of elemental sulfur takes time and depends on:
- number of sulfur oxidizing bacteria present
- temperature (75-104 degrees optimum)
- moisture content of soil (too wet or too dry will slow down process)
- size of sulfur particles (the smaller the better)
A single sulfur application normally takes at least 2 years for most the sulfur to react and form sulfuric acid. This, of course, depends on the above factors.
So, what do you do about calcareous soils? See the companion article in this week’s newsletter for specific recommendations. (Ward Upham)
Iron Chlorosis and Calcareous Soils
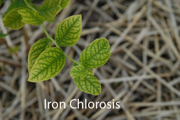
Iron chlorosis due to high pH soils is a significant problem in Kansas. Though Kansas soils normally contain adequate amounts of iron, a high pH makes that iron unavailable to the plant. Iron plays a major role in the production of chlorophyll. Thus, a lack of iron reduces the amount of chlorophyll and results in yellowing of leaves. Iron chlorosis weakens, and in severe cases, may kill a susceptible plant.
A popular recommendation for high pH soils is adding sulfur to lower pH. This works well for many soils, but not those that are calcareous. Calcareous soils are those that contain actual particles of calcium carbonate (limestone). Calcareous soils can be difficult to practically impossible to acidify because the sulfur must neutralize all the free limestone before the pH is affected long term. In many cases you would need well over a pound of sulfur per square foot just to neutralize the free lime.
So, what do you do? That depends on the situation. With vegetable gardens and annual flowerbeds, work products into the soil during the time of year when there are no plants present. Oregon State University suggests mixing 5 pounds of sulfur per 100 square feet into the soil before planting. The idea is to form little pockets of acidity that result in enough iron availability for the plants during the year of application. Note that this must be done each year. Another possibility is to use iron chelates. Iron chelates hold the iron in such a way that the plant can get to it. However, not all iron chelates will work in high pH soils. For soils with a pH over 7.2, use a chelate that contains FeEDDHA (Ethylene diamine-N,N bis (2hydroxyphenylacetic acid)). This can be found in the products Sequestar 6% Iron Chelate WDG, Sequestrene 138 and Millers FerriPlus. Chelates can either be mixed into the soil at planting or sprayed on the foliage early in the season. Reapply as needed. (Ward Upham)
Contributors: Cheryl Boyer, Nursery Crops Specialist; Ward Upham, Extension Associate
 RSS Feed
