Video of the Week:
Pruning Grape Vines
Vegetables:
Time to Plant Potatoes Approaching
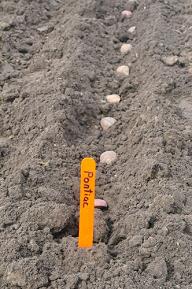
St. Patrick’s Day is just around the corner, so it is time to get seed potatoes in the ground. Actually any time from mid- to late-March is fine for potato planting. Be sure to buy seed potatoes rather than using those bought for cooking. Seed potatoes are certified disease free and have plenty of starch to sprout as quickly as soil temperatures allow. Most seed potatoes can be cut into four pieces, though large potatoes may yield more, and small less. Each seed piece should be between 1.5 and 2 ounces to insure there is enough energy for germination.
Each pound of potatoes should yield 8 to 10 seed pieces. Cut the seed 2 to 3 days before planting so freshly cut surfaces have a chance to suberize, or toughen, and form a protective coating. Storing seed in a warm location during suberization will speed the process. Plant each seed piece about 1 to 2 inches deep and 8 to 12 inches apart in rows. Though it is important to plant potatoes in March, emergence is slow. It is often mid- to late-April before new plants poke their way through the soil. As the potatoes grow, pull soil up to the base of the plants. New potatoes are borne above the planted seed piece, and it is important to keep sunlight from hitting the new potatoes. Exposed potatoes will turn green and produce a poisonous substance called solanine. Keeping the potatoes covered will prevent this. (Ward Upham)
Each pound of potatoes should yield 8 to 10 seed pieces. Cut the seed 2 to 3 days before planting so freshly cut surfaces have a chance to suberize, or toughen, and form a protective coating. Storing seed in a warm location during suberization will speed the process. Plant each seed piece about 1 to 2 inches deep and 8 to 12 inches apart in rows. Though it is important to plant potatoes in March, emergence is slow. It is often mid- to late-April before new plants poke their way through the soil. As the potatoes grow, pull soil up to the base of the plants. New potatoes are borne above the planted seed piece, and it is important to keep sunlight from hitting the new potatoes. Exposed potatoes will turn green and produce a poisonous substance called solanine. Keeping the potatoes covered will prevent this. (Ward Upham)
Rhubarb
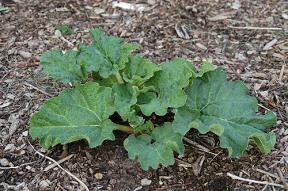
Rhubarb is a perennial vegetable that can be a bit tricky to grow in Kansas. It is native to northern Asia (possibly Siberia) and so is adapted to cold winters and dry summers. However, it is susceptible to crown rot and should not be subjected to “wet feet” and therefore should be grown in a well-drained soil. The addition of organic matter can increase drainage as well as raise the soil level so that crown rot is less likely. Also, have a soil test done as rhubarb does best with a pH below 7.0.
Rhubarb should be planted from mid-March to early April in Kansas. Mix 5 to 10 pounds of well-rotted barnyard manure into the soil for each 10 square feet of bed before planting. Rhubarb is propagated from crowns (root sections) that contain one or two buds. Plants should be spaced 2 to 3 feet apart in the row with 4 to 5 feet between rows. The crowns are planted shallow so that the buds are just one-half to 1 inch below the soil surface. Firm soil around the
crowns and make sure they are not in a depression that holds water. Recommended varieties include Canada Red, Crimson Red, McDonald and Valentine.
Rhubarb needs rejuvenated at least every 5 to 10 years and should be dug and divided in the same time period as new plantings are established. Use a cleaver or axe to cut crowns into sections that each contain one or two buds. Plant as described above.
Newly transplanted rhubarb should not be harvested the first year so the plant can recover from the transplant process. Only a few stalks should be harvested the second year to allow the plant to continue to build up its energy reserves. The harvest season for plants that are three years or older usually lasts about 8 weeks. Harvest only the largest and best stalks by pulling them slightly to the side so that they break away from the plant. Never harvest over one-third of the leaf stalks at one time. Only the leaf stalk (petiole) is eaten as the leaf blade contains oxalic acid and is poisonous.
Mulches can be used to reduce moisture loss, prevent weed growth and provide winter protection. However, it should be pulled away in the spring to allow the soil to warm so that early growth is encouraged. (Ward Upham)
Fruit:
Pruning Raspberries and Blackberries
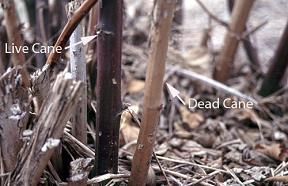
Raspberries and blackberries are perennial plants with biennial canes. In other words, a single plant will last many years but an individual cane will only live for two. In a cane’s first year, it will grow but will not produce fruit. The second year, it will fruit and then die. Though these canes can be removed after they have finished fruiting, many gardeners wait until now to remove them.
Dead canes are not difficult to identify. They are a much lighter color than live canes and are dry and brittle. These canes should be removed and discarded. The remaining canes should be thinned but the type of growth determines exactly how this should be done.
Black and purple raspberries and thornless blackberries tend to grow in a clump. Remove all the canes but 5 to 7 of the largest and healthiest in each clump. Cut back the remaining canes to living tissue if there was winter damage. Thornless blackberries will also produce a few suckers that come up some distance from the clump. These should be removed or dug and transplanted to increase the planting.
Red raspberries and thorny blackberries sucker badly and will fill the row with new plants. Prune out small canes within the row so that there are strong canes 4 to 6 inches apart. Head back all the remaining canes to about 5 feet. Keep aisles free of new suckers during the summer by mowing.
We now have what is called ever-bearing red raspberries and everbearing thorny blackberries. These are the exception to the rule in that they will bear fruit on first-year canes. Therefore, you can cut all canes to the ground in the winter and still have fruit. Examples include Heritage red raspberry and Prime-Jim, Prime-Jan and Prime Ark 45 blackberries.
For more detail and line-drawings that illustrate pruning techniques, see our publication titled, “Raspberries and Blackberries” at http://www.ksre.ksu.edu/bookstore/pubs/mf720.pdf. (Ward Upham)
Turfgrass:
Managing Turf in Shade
Turfgrasses differ in their capacity to grow in shade. Among Kansas turfgrasses, tall fescue is the best adapted to shade though it isn’t all that good. Although the fine fescues (i.e., creeping red, chewings, hard and sheep) have better shade tolerance, they lack heat tolerance and typically decline during hot Kansas summers. The warm-season grasses have the poorest shade tolerance, although zoysia does better than Bermuda or buffalo.
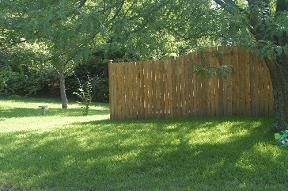
Where shade is too heavy for fescue, there are other courses of action. The most obvious is to either remove trees, or to prune limbs and thin the tree canopies. Grass will do better under openly spaced trees than under closely spaced trees. Pruned limbs and thinned canopies will allow more sunlight to directly reach the turfgrass. If possible, raise the mowing height in the shade to compensate for the more upright growth of the leaves, and to provide more leaf area for photosynthesis. The thin, weak turf in the shade may tempt you to fertilize more. Remember the problem is lack of light, not lack of fertility. Too much nitrogen in the spring causes the plant to grow faster and may result in weak plants. The nitrogen rate for shaded grass should be cut back to at least half of that for grass in full sun. Late fall fertilization after tree leaves have fallen, on the other hand, is important for shaded cool-season turfgrasses and should be applied at a full rate. Irrigate infrequently but deeply. Light, frequent irrigation may encourage tree feeder-roots to stay near the surface, which increases competition between the trees and the turf. Restrict traffic in the shade.
Many times, the best choice for shaded areas is switch from a turfgrass to a more shade-tolerant plant. For example, English ivy and periwinkle (Vinca minor) are much more shade tolerant than any turfgrass adapted to our area. Another option is simply to mulch the area where turf doesn’t grow well. The trees will love the cool, moist soil and the absence of competition. (Ward Upham)
Ornamentals:
Ten Rules for Planting Trees
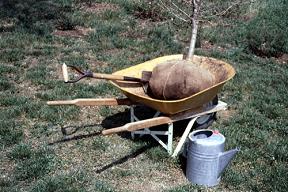
Before you begin spring landscaping, here are some tips on planting trees.
1. Select the right tree for the site. To avoid serious problems, choose trees that are adapted to your location. Consider whether the tree produces nuisance fruit or if there are disease-resistant varieties available. For example, there are a number of crabapple varieties that are resistant to apple scab and rust diseases. Also consider the mature size of a tree to be sure you have enough room. See http://www.hfrr.ksu.edu/p.aspx?tabid=731 or ask a local nurseryman for suggestions.
2. Keep the tree well watered and in a shady location until planting. When moving the tree, lift it by the root ball or pot and not by the trunk.
3. Before planting, remove all wires, labels, cords or anything else tied to the plant. If left on, they may eventually girdle the branch to which they are attached. The root flare (point where trunk and roots meet) should be visible. If it isn't, remove enough soil or media so that it is.
4. Dig a proper hole. Make the hole deep enough so that the tree sits slightly above nursery level. Plant the tree on solid ground, not fill dirt. In other words, don't dig the hole too deep and then add soil back to the hole before placing the tree. The width of the planting hole is very important. It should be three times the width of the root ball. Loosening the soil outside the hole so it is five times the diameter of the root ball will allow the tree to spread its roots faster.
5. Remove all containers from the root ball. Cut away plastic and peat pots; roll burlap and wire baskets back into the hole, cutting as much of the excess away as possible. If you can remove the wire basket without disturbing the root ball, do it. If roots have been circling around in the container, cut them and spread them out so they do not continue growing so that they circle inside the hole and become girdling roots later in the life of the tree.
6. Backfill the hole with the same soil that was removed. Amendments such as peat moss likely do more harm than good. Make sure the soil that goes back is loosened - no clods or clumps. Add water as you fill to insure good root to soil contact and prevent air pockets. There is no need to fertilize at planting. Note: Adding organic matter to larger area than just the planting hole can be beneficial, but it must be mixed in thoroughly with the existing soil. However, adding amendments to just the planting hole in heavy soil creates a “pot” effect that can fill with water and drown your new tree.
7. Don't cut back the branches of a tree after planting except those that are rubbing or damaged. The leaf buds release a hormone that encourages root growth. If the tree is cut back, the reduced number of leaf buds results in less hormone released and therefore fewer roots being formed.
8. Water the tree thoroughly and then once a week for the first season if there is insufficient rainfall.
9. Mulch around the tree. Mulch should be 2 to 4 inches deep and cover an area two the three times the diameter of the root ball. Mulching reduces competition from other plants, conserves moisture and keeps soil temperature closer to what the plants' roots prefer.
10. Stake only when necessary. Trees will establish more quickly and grow faster if they are not staked. However, larger trees or those in windy locations may need to be staked the first year. Movement is necessary for the trunk to become strong. Staking should be designed to limit movement of the root ball rather than immobilize the trunk. (Ward Upham)
Miscellaneous:
Adding Organic Matter in the Spring

Organic matter is a good way to improve garden soil as it improves a heavy soil by bettering tilth, aeration and how quickly the soil absorbs water. However, organic matter added in the spring should be well decomposed and finely shredded/ground. Manures and compost should have a good earthy smell without a hint of ammonia. Add a 2-inch layer of organic matter to the surface of the soil and work the materials into the soil thoroughly. Be sure soils are dry enough to work before tilling as wet soils will produce clods.
To determine if a soil is too wet to work, grab a handful and squeeze. If water comes out, it is much too wet. Even if no water drips out, it still may not be dry enough to work. Push a finger into the soil you squeezed. If it crumbles, it is dry enough, but if your finger just leaves an indentation, more time is needed. Be sure to take your handfuls of soil from the depth you plan to work the soil because deeper soils may contain more moisture than the surface. (Ward Upham)
Contributors: Ward Upham, Extension Associate
 RSS Feed
