Most junipers are dioecious, meaning they have both male and female plants. About half the junipers (the males) will have this coloration. The female flowers are much less obvious. If you have clients who are concerned about this brown coloration, have them check the plants to ensure the male flowers are the cause. If they are, assure them that this is normal and will fade with time. (Ward Upham)
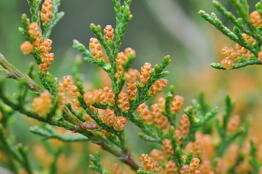
Certain eastern redcedar and various other junipers are showing a brownish cast when viewed from a distance. This may be the male flowers. Male flowers are on the tips of the leaves and look somewhat like a cross between a miniature hand grenade and a pinecone. Shaking the branches on dry days will often result in a cloud of pollen being released.
Most junipers are dioecious, meaning they have both male and female plants. About half the junipers (the males) will have this coloration. The female flowers are much less obvious. If you have clients who are concerned about this brown coloration, have them check the plants to ensure the male flowers are the cause. If they are, assure them that this is normal and will fade with time. (Ward Upham)
0 Comments
The fruit on ornamental pears is quite small; about the size of a marble. However, it can be very messy if it lands on sidewalks or driveways and people squish the fruit when walking or driving. You may have noticed that ornamental pears are producing fruit much more commonly than they have in the past. Why is this so? A little history is needed in order to understand what has happened. Ornamental pears used to be called Bradford pears. This was a bit of a misnomer as ‘Bradford’ was a specific variety. Ornamental pears were called Bradfords because this was practically the only variety that people planted. Therefore, if you bought an ornamental pear a number of years ago, it was likely a Bradford. All was well and good until people noticed that Bradfords would fall apart after a number of years due to a weak branching structure. Therefore, nurseries started selling “improved” ornamental pears that were not Bradfords such as ‘Aristocrat,’ ‘Capital,’ ‘Redspire,’ ‘Chanticleer’ and various other varieties. It was felt that all of these varieties had a stronger branching pattern that ‘Bradford’ but such may not be the case. Both ‘Chanticleer’ and ‘Redspire’ have shown branch breakage. ‘Aristocrat’ does appear to have better branch angles but more time is needed to make a firm recommendation. Here is the key. Pears usually require cross-pollination in order to fruit. In other words, you must have two different varieties of pear before fruit forms. When all we had were Bradfords, we had no fruit due to a lack of cross-pollination. Now that we have such a mixture of varieties, we will get fruit as long as two different varieties of ornamental pears bloom at the same time and are close enough that bees can work between them. This formation of fruit can also lead to a second problem. Volunteer trees can come up from the seed contained in the fruit. Therefore, you may see ornamental pears come up in areas where no one planted them. This has become enough of a problem that several states have added ornamental pears to their invasive plant list. There isn’t much homeowners can do about these trees producing fruit. Just be careful to plant in an area so that, if fruit forms, it will not be a nuisance. (Ward Upham) Transplant solutions are mild fertilizer solutions that are applied to newly transplanted vegetables and flowers. Transplant solutions are also called starter solutions or root stimulators. Early-season plants not given a transplant solution often develop a purplish tinge to the leaves caused by a phosphorus deficiency. Surprisingly, the soil may have plenty of phosphorus but plants often have difficulty taking up nutrients in cool soils. The starter solution places soluble nutrients near the roots so the plants get off to a good, strong start. Transplant solutions (root stimulators) are available for sale but it is also possible to make your own transplant solution from a fertilizer that contains more phosphorus than nitrogen or potassium such as a 5-10-5, 10-20-10 or 11-15-11. Mix 2 to 3 tablespoons of one of the above fertilizers in a gallon of water several hours before use. The fertilizer won't completely dissolve but enough will go into solution to get plants off to a good start. Use about 1 cup of transplant solution for each transplant. Sidedressing is a fertilization done after the plants are established. A fertilizer containing primarily nitrogen is used to keep plants growing and productive. Nitrate of soda (16-0-0) is often used at the rate of 2 pounds fertilizer per 100 feet of row. More commonly available lawn fertilizers such as a 30-3-3, 29-5-4 or something similar can also be used but cut the rate in half. Be sure any lawn fertilizer used does not contain weed preventers or weed killers. Note that most fertilizers weigh about 1 pound per pint of product. We have a sidedressing sheet available that lists crops, rate of fertilizer application and timing of application(s) for many common vegetables as well as annual flowers. The sheet can be viewed at https://tinyurl.com/j2ggaa6 (Ward Upham) Plastic mulch is sometimes used to start vegetables such as tomatoes and melons earlier than normal. Commercial growers use a machine to lay the mulch, but home gardeners must do this by hand. Following are some tips on how this is done. 1. Fertilize according to soil test. You won't be able to add fertilizer after the plastic is down. 2. Work the soil so that the bed can be easily shaped. 3. Use a garden hoe to form a trench along all edges of the plastic. The soil should be pulled to the outside of the bed. The trench should be formed six inches in from the edge of the plastic and extend along both sides and both ends. The trench should be deep and wide enough to bury six inches of plastic. 4. Lay trickle irrigation tube down the center of the bed. This isn't absolutely necessary but it makes it much easier to water. Overhead watering will hit the plastic and roll off. 5. Lay the plastic down and cover the edges with soil. You need to slit the edge of the plastic where the trickle irrigation tube enters the end of the bed. 6. Plant when the soil temperature reaches the correct temperature for the crop (55 degrees for tomatoes and 60 degrees for melons) at a 2.5-inch depth. Check the temperature at about 11:00 a.m. to get a good average temperature. Check for several days in a row to ensure the temperature is stable. (Ward Upham) |
AuthorsCynthia Domenghini runs the Horticulture Response Center in the Department of Horticulture and Natural Resources at Kansas State University. Other contributors include K-State Extension Specialists. Archives
March 2024
Categories
All
|